


Replicate APIs are powerful tools for AI-powered applications, but they can run into timeout issues when deployed on Vercel. This is because Replicate's operations, like video generation or any generation that runs into a cold boot, can take longer than Vercel's few-second timeout limit. This problem can be solved by implementing API polling.
What is Polling?
Polling is a technique where your application checks the status of a long-running task at regular intervals. Instead of waiting for a task to finish, your app sends periodic requests to check its progress. This allows your application to remain responsive while handling time-consuming operations.
In the context of using Replicate APIs with Vercel, polling helps you track your API requests and update your app once the task is complete, all while avoiding Vercel's timeout limits.
Tech Stack
This guide uses the T3 stack, a popular starter template for building full-stack, typesafe Next.js applications. T3 incorporates TypeScript, Next.js (in this example with the App Router), and provides pre-configured tools and best practices. This combination offers a robust foundation, ideal for quickly starting and scaling projects.
Setting Up Your Project
These steps illustrate the process of implementing polling with Next.js and the app router. Because we’re using the T3 stack, deploying to Vercel and many setup details are handled for you.
Project Structure:
- src/app/_components/generate_form.tsx: Form component for image generation
- src/app/_components/image_generator.tsx: Main component handling image generation and polling
- src/app/api/predictions/route.ts: API route for starting predictions
- src/app/api/predictions/[id]/route.ts: API route for checking prediction status
- src/app/page.tsx: Main page component
- src/app/layout.tsx: Root layout component
Step 1: Create a Project
Create a new T3 app: Run this command in your desired project directory: npm create t3-app@latest
Step 2: Add API Key
Add your Replicate API token to the .env file (create this file in the highest-level folder of your application if you cloned the example code):
REPLICATE_API_TOKEN="your API token"
Implementation
Step-by-step walkthrough of API polling in this example:
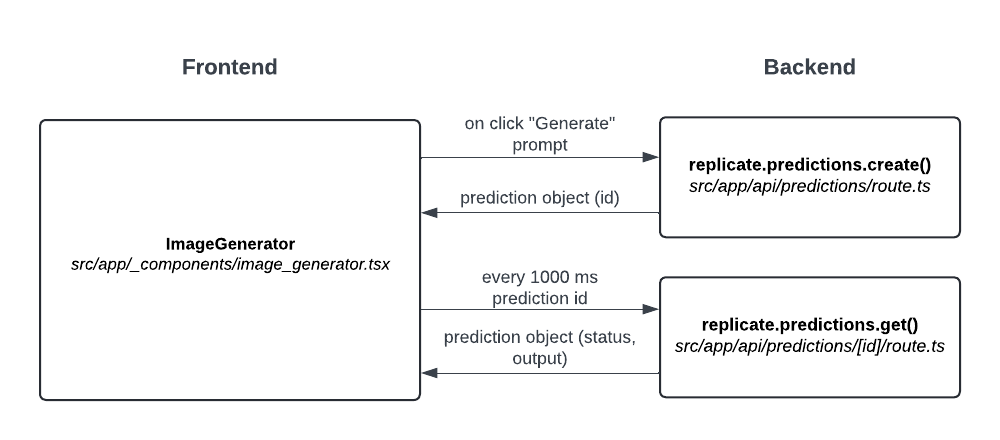
- When the user presses ‘Generate,’ the API for SDXL is called from the front-end with app/api/predictions/route.ts.
- This returns a prediction object, including a unique id.
- Using this prediction.id on the front-end, the application checks status every 1000 milliseconds with replicate.predictions.get(id) in app/api/predictions/[id]/route.ts. This check occurs multiple times until the
predictionobject returns a status of ofsucceeded. - To prevent Vercel's data caching issues, this line is added at the top of the id-specific API route file:
export const fetchCache = 'force-no-store' (This step took awhile to debug).
Testing
To test your implementation, start your development server: npm run dev
Visit http://localhost:3000/ to test out the application.
Deploying
If you haven’t deployed to Vercel before, create an account at https://vercel.com/
Follow the guide: How to deploy to Vercel
Adding API Tokens in Vercel Project Settings
After deploying your project to Vercel, you need to add your Replicate API token to your project's environment variables:
- Go to https://vercel.com/[your-username]/[your-project-name]/settings/environment-variables
- Click on "Add New"
- Set the name as
REPLICATE_API_TOKEN - Paste your Replicate API token as the value
- Select the environments where this variable should be available (Production, Preview, Development)
- Click "Save"
Remember to redeploy your application after adding the environment variable for the changes to take effect.
